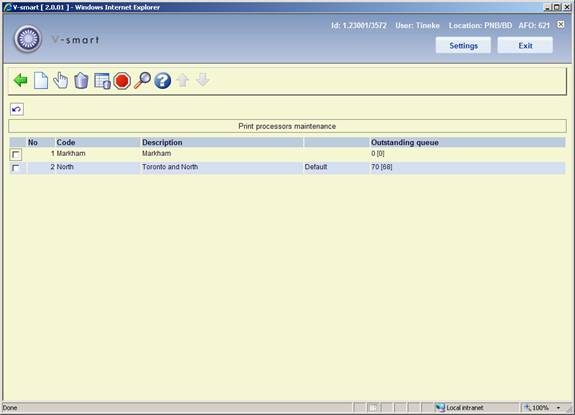
This option is used for the definition and the maintenance of the print processors that are used for stack requests and mail merging. See the general help on these subjects for background information.
After selecting this option, an overview screen will be displayed:
: Use this option to add a new print processor. See section 621.6.1 for details.
: Select a line and then this option to view/modify the details of a print processor. See section 621.6.1 for details.
: Select a line and then this option to delete the print processor. The system will warn if the print processor is connected to a printer (and can therefor not be deleted).
: This starts a process that clears the entries in all sql tables used by the mailmerging mechanism.
: You can use this option to stop the print processor.
The print process normally runs on a dedicated PC. Of course you can monitor, and if necessary stop, the process from there.
From the server side you cannot see if the print processor is running. This option inserts a row into a sql table that is periodically read by the print processors. If the print processor finds such a row in this table it will stop. Of course if everything runs smoothly, the print processor need never be stopped.
: You can use this option to view the queue details for the selected print processor. See section 621.6.2.
After selecting the option or an input form will be displayed:

Processor id: A unique ID to identify the print processor.
Description: Free text to describe the print processor.
WP package: This is reserved for future use.
Maximum WP processes: Numeric value. A mailmerge process is very CPU intensive. It is therefore possible to set a limit on the number of concurrent processes which can be initiated.
When a mailmerge process is required, the system will check for the presence of data in the SQL table “Notices.WProcesses” – for records with Ids 1, 2, 3 and so on up to the maximum permitted here.
Use as default: If this option is ON, the print processor will be used as the default print processor for the current meta circulation institution.
This is meant to be a “diagnostic” display. The option might be used if staff have reason to believe that there is a problem with the print processor.
Select a line and then the option to view the queue details for the selected print processor. An overview screen will be displayed:

View: This is the mailmerge view used to generate the document(s). See the general help on mailmerge for more information on Views.
Printer: This is the printer the output was sent to.
Quick print: This will be set to 0 or 1. There are actually two queues for printing – the regular queue (Quick print = 0) and a separate queue for those items which we would expect to be printed quickly and are required more or less immediately (usually “labels”).
Number of entries: This is the number of individual elements of the output for this printout (for example, the number of overdue items being printed). This does not directly equate to the number of notices or printed sheets; however, clearly, the greater the number then the longer it will take to create the output. The time taken to generate notices from these depends on the type of notice and the complexity of the mailmerge master document, but a guideline of a second / entry gives a rough and ready approximation.
This feature provides a mechanism for building a flexible redirection of mailmerge printing. During the specified time output will be rerouted elsewhere.
After selecting this option, an overview screen will be displayed:

: Use this option to create a new printing rota. See section 621.7.1 for details.
: Select a line and then this option to add printers to the rota. See section 621.7.2 for details.
: Select a line and then this option to delete the rota. The system will prompt for confirmation. If the rota is in use (i.e. has printers linked to it) you cannot delete it.
: Select a line and then this option to view/modify the general details of the rota. See section 621.7.1 for details.
After selecting the option or an input form will be displayed:

After the Printing rota id and the general Description are entered for a new rota, you are taken to a grid where you can define the printers and time intervals associated with the current rota. See below for details.
: Select a line and then this option to add printers to the rota. When adding a new rota, you are taken to this screen automatically after saving the general details.
An overview screen will be displayed:

: Use this option add to add a printer to the rota. An input form will be displayed:
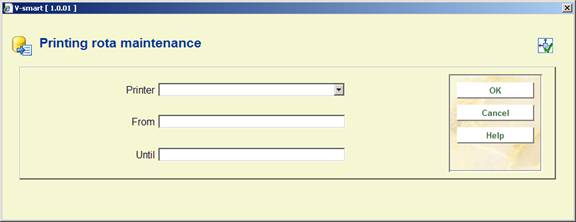
Select a printer from the dropdown list. The entries in the dropdown list are defined elsewhere in AFO 621. Enter the start and end times for the redirection period.
: Select a line and then this option to view/modify the details. An input form similar to the one above will be displayed.
: Select a line and then this option to remove a printer from the list.
Once the printing rotas are defined they will be available to be attached to a system printer (using AFO 621 – Maintain system printers) or directly to a service point (using AFO 618 – Service points).
This option is related to the ERP export for AFAS (a feature designed initially for the Dutch market). Most of the related parameters are set in AFO 494.
After selecting this option an input form will be displayed:

You can enter the full path for storage of the ERP export file and the backup file for the ERP export.
· Document control - Change History
|
Version |
Date |
Change description |
Author |
|
1.0 |
June 2008 |
creation |
|
|
1.1 |
September 2008 |
new options for mail merging, stack requests and print rota's |
|
|
2.0 |
November 2009 |
general improvements; print processor; new option to display queue; new menu option for ERP output path |
|